clear all

Type

Cup Chain's magazine
Video tutorials
Step by step DIY
Styling ideas
Learn new Technics
Most popular
Crystals inspiration
Color combinations
Technical questions

Jewelry

Necklace
Bracelet
Earring
Ring
Pendant
Hair Accessorie
Jewelry sets

Techniques

Embedding
Gluing
Beading
Other
Crimp Elements
Stringing

Materials

Cup chain
Stone setting
Metal embedding
Metal casting
Charms
Chains
Swarovski
Cabochons
Beads
Leather
Strings
Pearls
SW rhinestone

Skill level

Beginners
Intermediate
Advanced

Metal Plating

Antique Silver
Antique Silver
Antique Copper
Antique Copper
Antique Brass
Antique Brass
Shiny Silver
Shiny Silver
Gold
Gold
Nickel
Nickel
Rose Gold
Rose Gold
Black
Black
Bronze
Bronze
Noir Black
Misty Gold

Colors

Black
Black
Gray
Gray
White
White
Yellow
Yellow
Orange
Orange
Red
Red
Pink
Pink
Purple
Purple
Blue
Blue
Turquoise
Turquoise
Green
Green
Multi-color
Multi-color
Brown
Brown
Metallic
Metallic
Beige
Beige
Sparkly
Sparkly

Themes

Casual
Basic
Fancy
Bridal
Ethnic
Urban
Young
Vintage
Flowers
Winter
Spring
Summer
Autumn
Christmas
Valentin’s day
Mother’s day
Holidays
Religion
Evening

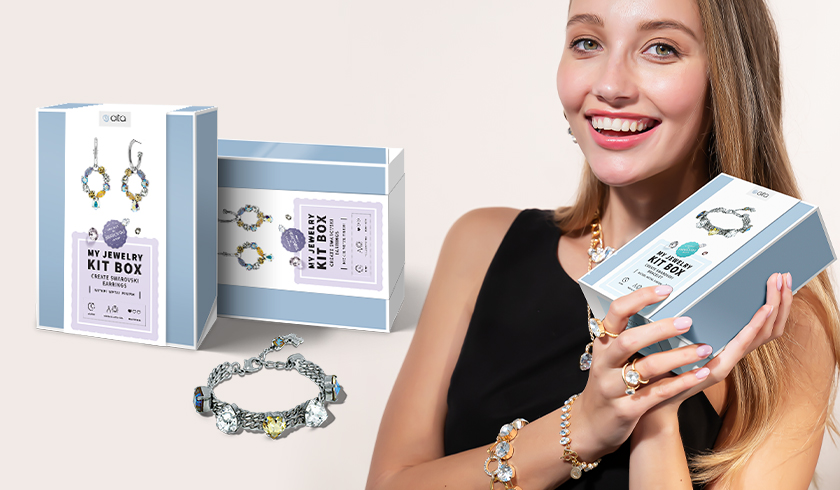
Jewelry DIY KIT: Create elegant nickel Sparkling bracelet with Swarovski crystals

24/03/2020
https://youtu.be/J-eBupD7qVY

DIT MANUAL for Jewelry making Kit Box - get the supreme DIY experience!

Enjoy assembling this dramatic & elegant bracelet perfect for any occasion


Discover how fun it is to create your own sparkling Swarovski Nickel bracelet.

In this KIT BOX, you will find all the necessary components to create a perfect piece of jewelry.


Kit Box Contains:

1. Bracelet base

2. Nylon Jaw Flat Nose Pliers

3. Prongs lifter

4. 29ss Chaton Swarovski Crystal

5. 12mm Rivoli Swarovski Crystal

6. 12mm Trilliant Swarovski Crystal

7. 11mm Heart Swarovski Crystal

8. 10x14mm Swarovski Crystal

9. 10mm Imperial Swarovski Crystal


Additions:

1. Ultimate box for jewelry

2. Instructions

3. Illustrated brochure

4. Fabric work surface


Below you can see all the steps and the technical instructions of assembling the bracelet.


Step by Step


Put all the ingredients in front of you on a comfortable working surface. Hold the bracelet base (1) with one hand and insert one of the crystals into it's dedicated setting support the crystal with your finger.


With Nylon jar pliers (2) in your other hand band the prongs over the crystal until it holds still. Repeat the process with all other crystals.


Your new bracelet is done! 


This glamorous rhodium plated bracelet brings together multi-colored stones and classic clear sparkle. Radiant and timeless: your perfect plus-one for special occasions.


How to use the Kit: 

The kit is simple to make (recommended to use over the age 12) - and does not require any previous experience or any knowledge of jewelry designing.

The result is absolutely amazing - the combination of the metal together with rich and sparkling effect of Swarovski Crystals cannot be ignored. 


KIT BOX

The Kit is packed in a multifunctional and very stylish box. You can leave it after use or repack the finished product immediately in it. The idea is simple: you got the kit, opened the package, embedded the jewelry, packed it back in the box and presented it to the one you love! It is very cool and practical!


Have fun creating:)!


Title
Plating/Rhinestone
Quantity
Price

Related Tutorials:

Making wrap around bracelets DIY
Get some great ideas and tips for making a truly unique wrap around bracelets!
Cup Chain's magazine
Bright colors jewelry set for a casual look
Step by step DIY
Creating colorful asymmetric and trendy jewelry collection
Learn how to create new asymmetric jewelry with a wonderful summer colors
Cup Chain's magazine

Help us improve our school

Was the information Usefull? Yes No
Name:
Email Address:
Which other tutorials or articles would you like to see
Please note any suggestions for improvements for us to get better?

Please Wait

Succuess

Error Failed

0.7308239